Skip all navigation and jump to content Jump to site navigation Jump to section navigation.
NASA Logo - Goddard Space Flight Center + Visit NASA.gov region to select the NASA home page region to select the NASA GSFC home page
AEROSOL OPTICAL DEPTH AEROSOL INVERSIONS SOLAR FLUX OCEAN COLOR Maritime Aerosol Network
For receiving updates on AERONET - subscribe to the mailing list by sending an email to aeronet-join@lists.nasa.gov
Aerosol Robotic Network (AERONET)
region to select NASA home page region to select NASA GSFC home page

 +Home


Home
AEROSOL/FLUX NETWORKS
CAMPAIGNS
COLLABORATORS
DATA
LOGISTICS
NASA PROJECTS
OPERATIONS
PUBLICATIONS
SITE INFORMATION
STAFF
SYSTEM DESCRIPTION
 
AERONET DATA ACCESS
 
AERONET ALL Site Lists (V3)

+ Text Format

+ Extended Text Format

+ Google Earth Format

+ All Lists

AERONET Active Site Lists (V3)

+ Text Format

+ Google Earth Format

AERONET Instrument Troubleshooting Interface - Solutions for ROBOT ERRORS Flag

Condition(s)
Flag if >35; or >10 any day during week

How To Check/Test
Model 4 and 5: SCN > run PARK then GOSUN
Model T: SCENARIOS > run PARK then GOSUN

Solution Level 1 (< 5 minutes)
1. Check for cable binding or pulling as the instrument moves.
2. Ensure that adequate 12V power is being supplied to the instrument.
3. Check/reseat the connector panel and the AZ, ZN, and power connections. Robot errors in conjunction with filter wheel or sensor head errors often indicate a problem with connections or 12V power.

Solution Level 2 (more involved)
1. Look for abnormal movements or sounds when running PARK and GOSUN. After PARK the instrument should point towards nader and the robot claw should be level. After GOSUN the illuminated point at the base of the collimator should fall within ~1 cm of the pinhole marker.
2. Check the AZ and ZN axis for tightness. Tighten if loose (see Drive Bolt Tightening Guide).
3. Try a different connector panel (if available).
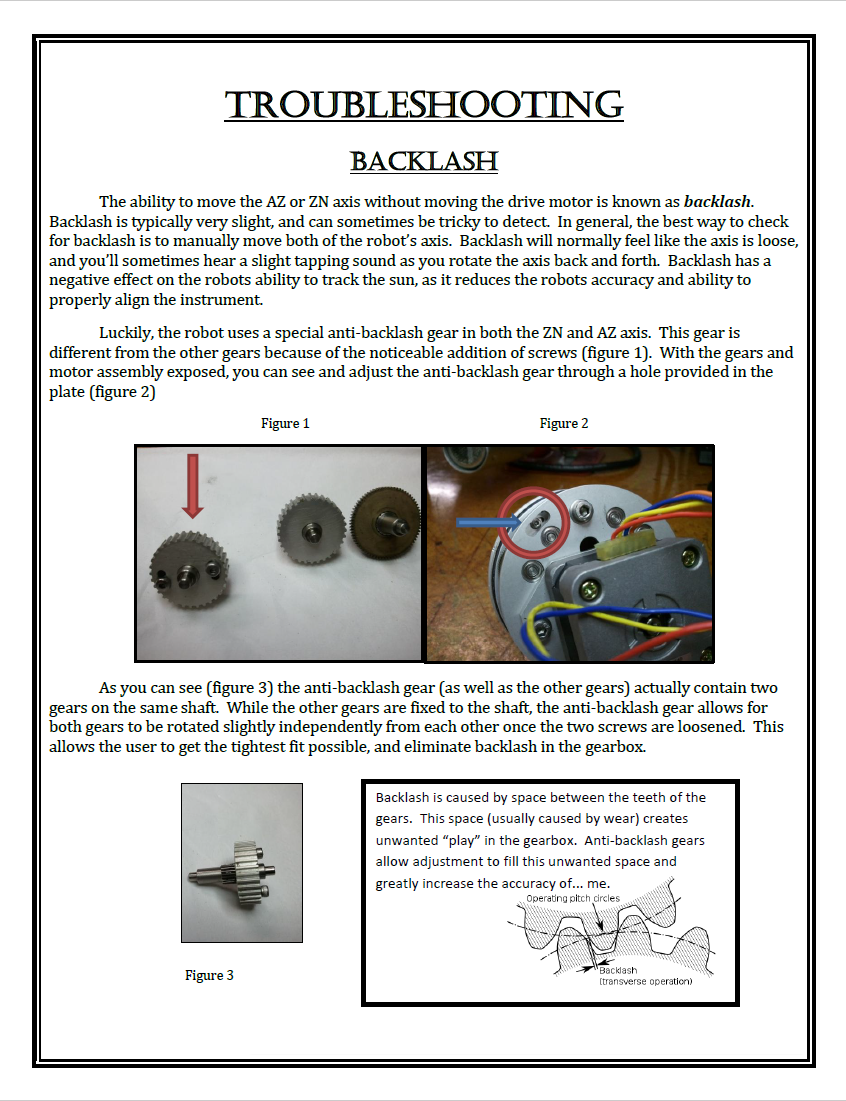
Solution Level 3 (last resort)
1. Check the robot proximity switches and adjust if necessary. (See Model T Proximity Switch Test and Adjustment or Model 5 Proximity Switch Test and Adjustment instructions).
2. Check for backlash and correct if necessary (see Backlash adjustment instructions).
3. Check the robot motor belt and tighten or replace if necessary (see Drive Belt Tightening Guide and Timing Belt Replacement).
4. Replace the robot.

Proper loop formation
  + Privacy Policy and Important Notices NASA Curator: Petar Grigorov
NASA Official: Pawan Gupta
Last Updated: April 15, 2026